Contents:
- Essential Tools and Equipment
- Understanding Hair Structure and Angles
- Preparing Your Hair for Cutting
- Wash and Condition
- Dampen Slightly
- Divide Into Sections
- What the Pros Know: Professional Technique
- Techniques for Different Cut Types
- A Blunt Bob Cut
- Layered Cuts for Volume
- Feathered Edges for Softness
- The Most Common Beginner Mistakes
- Cutting Too Much Too Quickly
- Uneven Pressure with Scissors
- Cutting Dry Hair
- Not Using a Guide Section
- Ignoring the Hair Grain
- Sustainability and Eco-Friendly Cutting
- Regional Variations in Hair Types
- Step-by-Step Guide for Your First Cut
- Preparation (5 minutes)
- Setup (5 minutes)
- Cutting the Guide Section (10 minutes)
- Matching Other Sections (20-30 minutes)
- Refinement (10-15 minutes)
- FAQ Section
- Can I cut my own hair if it’s curly?
- What’s the difference between hair scissors and regular scissors?
- How do I cut layers without them looking choppy?
- Is it better to cut dry or wet hair?
- How often should I cut my own hair?
You’ve decided to trim your own hair or cut someone else’s. Professional salon haircuts cost £35-60 in the UK, and styling appointments add up quickly. Learning to cut hair with scissors gives you control over your results and saves money significantly. With proper technique, you can achieve clean, professional-looking cuts at home.
Essential Tools and Equipment
Using regular kitchen scissors is the fastest way to disaster. Hair scissors are specifically designed with sharp blades, precise angles, and optimal weight distribution. Professional hairdressing scissors cost £20-50 for quality beginner-friendly options.
- Hair cutting scissors: Look for 5.5-6 inch length, sharp blades, smooth operation. Brands like Jaguar or Olivia Garden (available from Boots or Amazon UK) offer quality options under £40
- Thinning scissors: These have serrated blades to remove bulk without cutting bluntly. Optional for beginners but invaluable as you develop skill
- Spray bottle: Dampen hair for even cutting (£3-5)
- Fine-toothed comb: Essential for dividing hair into sections (£5-8)
- Hair clips: Hold sections in place whilst working (£2-4)
- Mirror: A good quality hand mirror (£10-15) plus your bathroom mirror
- Towel: To catch trimmings and protect clothing
Total investment: roughly £60-120 for quality tools. This pays for itself after 2-3 DIY haircuts.
Understanding Hair Structure and Angles
Hair lies in a particular growth pattern called the “hair grain.” Cutting against the grain produces blunt, chunky results. Cutting with the grain creates softer, more natural-looking lines. Understanding this difference separates amateur cuts from professional ones.
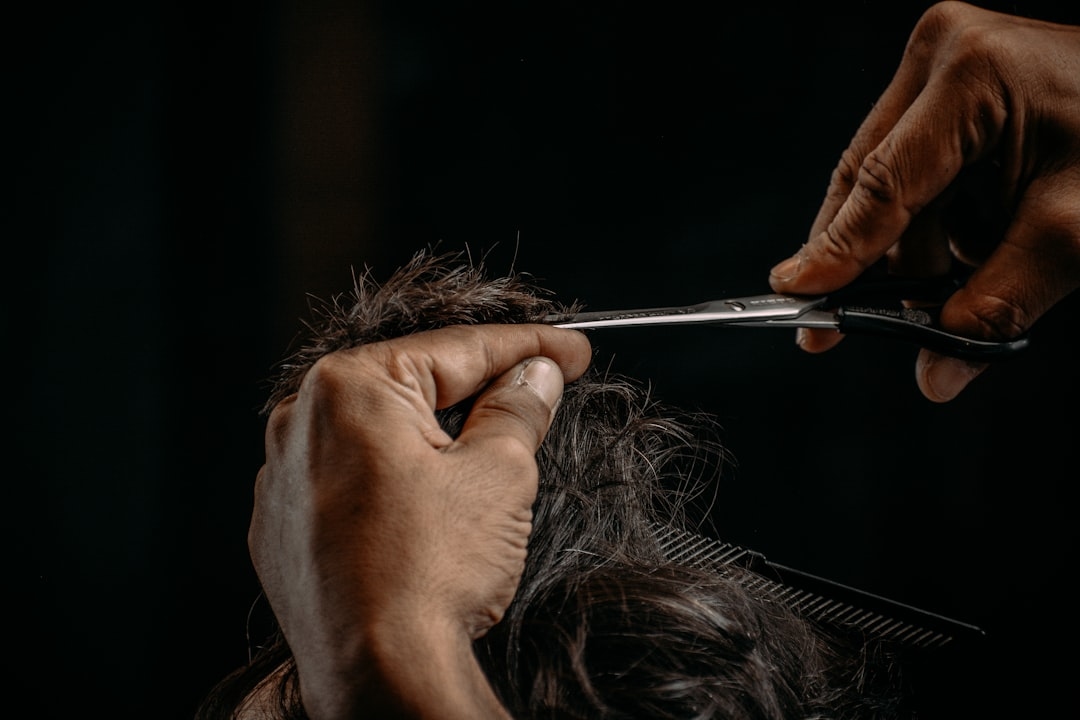
The angle of your scissors relative to the hair also matters enormously. A 45-degree angle creates textured, choppy effects. A perpendicular (90-degree) cut creates blunt lines. A 30-degree angle creates soft, feathered edges. For beginner cuts, 45-degree angles are most forgiving and produce flattering results.
Preparing Your Hair for Cutting
Wash and Condition
Start with clean, towel-dried hair. Dry, dirty hair behaves differently than clean hair, making measurements unreliable. Condition thoroughly—conditioned hair holds its shape better during cutting.
Dampen Slightly
Hair should be damp but not soaking. Use your spray bottle to mist it lightly. Soaking wet hair stretches and shrinks unpredictably when it dries, making your cut look uneven once dried. Damp hair is the ideal texture for accurate cutting.
Divide Into Sections
This is crucial. Divide your hair into 4-6 sections using clips. Create one section on top (like a faux hawk), sections on each side, and sections in the back. This ensures even cutting across your entire head and prevents accidentally missing sections.
What the Pros Know: Professional Technique
Pro Tip: Use the “guide section” method. Cut one small section perfectly first, then use it as a guide for all subsequent sections. This creates consistency. Professional stylists cut a section below the ear first, establish the exact length and angle, then cut all other sections to match this guide.
This technique removes guesswork. You’re not trying to estimate perfect length across your entire head—you’re simply matching a reference section you’ve already perfected.
Techniques for Different Cut Types
A Blunt Bob Cut
This is ideal for learning. A blunt cut is forgiving because you can see your progress clearly.
- Decide your desired length (shoulder-length, ear-length, chin-length, etc.)
- Cut a small section at ear level as your guide—cut straight across at your desired length, using scissors perpendicular to the hair
- Hold the scissors at 90-degree angle perpendicular to your hair
- Match all sections to this guide section
- Work in layers from front to back to maintain even length
A blunt bob typically costs £45-75 at UK salons. Learning to cut your own saves this cost.
Layered Cuts for Volume
Layers create movement and reduce bulk in thick hair. This requires more technique but produces flattering results.
- Establish a base length using the blunt-cut method above
- Hold hair upward (perpendicular to your scalp) at the crown
- Cut at a 45-degree angle, removing about 1-2 inches
- Move down the head, maintaining consistent 45-degree angles
- The 45-degree angle creates layers that are progressively longer toward the bottom, creating movement
Feathered Edges for Softness
Feathering removes bulk from ends without creating bluntness. Hold sections of hair and cut at a 30-degree angle, starting at shoulder height and moving downward with slight flicking motions. This creates wispy, soft edges.
The Most Common Beginner Mistakes
Cutting Too Much Too Quickly
Hair grows roughly 6 inches per year, or 0.5 inches monthly. You can afford to remove only 0.5-1 inch at a time if you want to maintain length. Beginners often remove 2-3 inches thinking they’re being precise. This limits second chances if something goes wrong.
Start by removing just 0.5 inches. Assess the result. Make another 0.25-inch cut if needed. You can always remove more; you can’t add it back.
Uneven Pressure with Scissors
Cutting requires consistent pressure. Squeezing scissors unevenly creates jagged rather than clean cuts. Grip the scissors firmly but not tensely. Move your arm smoothly, letting the scissors do the work rather than sawing back and forth.
Cutting Dry Hair
Dry hair shrinks when it dries again. You’ll cut what seems like the right length, it dries, and suddenly it’s shorter than intended. Always cut damp hair.
Not Using a Guide Section
Trying to estimate length by eye alone causes inconsistency. Use the guide section method without fail. This single practice eliminates 90% of beginner mistakes.
Ignoring the Hair Grain
If your scissors seem to be creating uneven cuts despite good technique, you might be cutting against the grain. Study your hair’s growth pattern. Cut with the grain, moving your scissors in the direction hair naturally grows.
Sustainability and Eco-Friendly Cutting
Home haircuts are inherently more sustainable than frequent salon visits. You’re reducing transportation (no driving to salons), reducing water usage (no salon shampoo/rinse cycles), and eliminating product waste (salon rinses and treatments).
Keep cut hair in a compost bin rather than the regular bin. Hair is organic material that decomposes. Alternatively, offer it to gardeners—some use hair as a nitrogen-rich fertiliser or as a rodent deterrent around crops.
Quality scissors used regularly become family heirlooms rather than disposable tools. A £40 pair of professional scissors used properly will outlast £200 worth of disposable drugstore scissors. This longevity is genuinely sustainable.
Regional Variations in Hair Types
Northern regions with cooler, damper climates (Scotland, Northern England, Wales) tend to have frizzier hair due to humidity. These hair types require shorter, more frequent trims to look neat. Southern regions with drier air see hair that holds styles longer and tolerates longer trim intervals.
If you live in a humid region, plan trims every 4-6 weeks. In drier areas, 6-8 weeks between trims is sufficient. Your local climate should influence your cutting schedule.
Step-by-Step Guide for Your First Cut
Preparation (5 minutes)
- Wash and condition hair thoroughly
- Towel dry until damp (not soaking, not dry)
- Use spray bottle to mist hair lightly
- Comb through gently, removing tangles
Setup (5 minutes)
- Divide hair into 4 main sections using clips
- Sit in front of your bathroom mirror with good lighting
- Have your hand mirror available for seeing the back
- Drape a towel over your shoulders to catch trimmings
Cutting the Guide Section (10 minutes)
- Unclip a section near your left ear
- Comb it straight down
- Hold between thumb and index and middle finger horizontally
- Position scissors perpendicular to hair
- Make a small cut (0.5 inch) at your desired length
- This is your guide—photograph it mentally
Matching Other Sections (20-30 minutes)
- Unclip right ear section
- Pull it into position and match the left section’s length
- Cut the back left section, matching the ear sections
- Cut the back right section, matching the others
- Cut the top section, using shorter scissors (as top hair is often styled upward)
- Stand back frequently to assess overall shape in the mirror
Refinement (10-15 minutes)
- Blow dry your hair to see the final result
- Make minor adjustments if needed (only if absolutely necessary)
- Style as you normally would
Total time for your first cut: roughly 50 minutes. Once you develop skill, this drops to 25-30 minutes.
FAQ Section
Can I cut my own hair if it’s curly?
Yes, but with modifications. Curly hair shrinks when dry, sometimes by 20-30%. Always cut longer than your target length to account for shrinkage. Cut curly hair whilst it’s wet and curled (not stretched), as this reflects how it will dry.
What’s the difference between hair scissors and regular scissors?
Hair scissors have sharper blades, more precise angles, and specific weight distribution. Regular scissors compress hair instead of cutting it cleanly, creating ragged edges. The investment in proper hair scissors is non-negotiable.
How do I cut layers without them looking choppy?
Use 45-degree angles rather than perpendicular cuts. Keep layers subtle—don’t remove more than 2 inches from the longest layer. Practice on a blunt cut first before attempting layers.
Is it better to cut dry or wet hair?
Always cut damp hair. Wet hair is too stretchy and gives inaccurate measurements. Dry hair is unpredictable. Lightly dampened hair is ideal.
How often should I cut my own hair?
Most hair benefits from trims every 6-8 weeks to maintain shape and remove damaged ends. If you’re cutting solely to remove damage, every 8-10 weeks is sufficient. More frequent cuts (every 4-5 weeks) create more dramatic style changes.
Learning to cut your own hair with scissors is a valuable skill that pays for itself immediately. Your first cut might be imperfect—everyone’s is. But with the guide section method, proper tools, and attention to angle and moisture, your second and third cuts improve dramatically. Within three haircuts, you’ll be cutting better than many expensive salons. The money you save, and the convenience of cutting whenever you want, make this skill genuinely worthwhile.